Showing posts with label Bones. Show all posts
Friday, December 6, 2013
Beantown Barking Spiders: Crazy as a Looney
Besides being able to field two trolls, the other entertaining thing that makes the goblin team in Blood Bowl unique is their use of secret weapons. If you saw my Barking Spiders conversions post then you might recall the conversion that I did for my chainsaw-wielding looney with a big, nasty saw blade reveling over the corpse of an unfortunate human, maybe a Norseman or Chaos Marauder. Because the chainsaw is the secret weapon positional of the most deranged and mentally unbalanced member of a goblin team I had to paint him first. Goblins might not be able to stand toe-to-toe with other teams in strength or skill, but no team can match their reckless abandon and disregard for the rules. To put it another way, they don't know karate, but they do know ka-razy.
Beantown Barking Spiders: Trolls
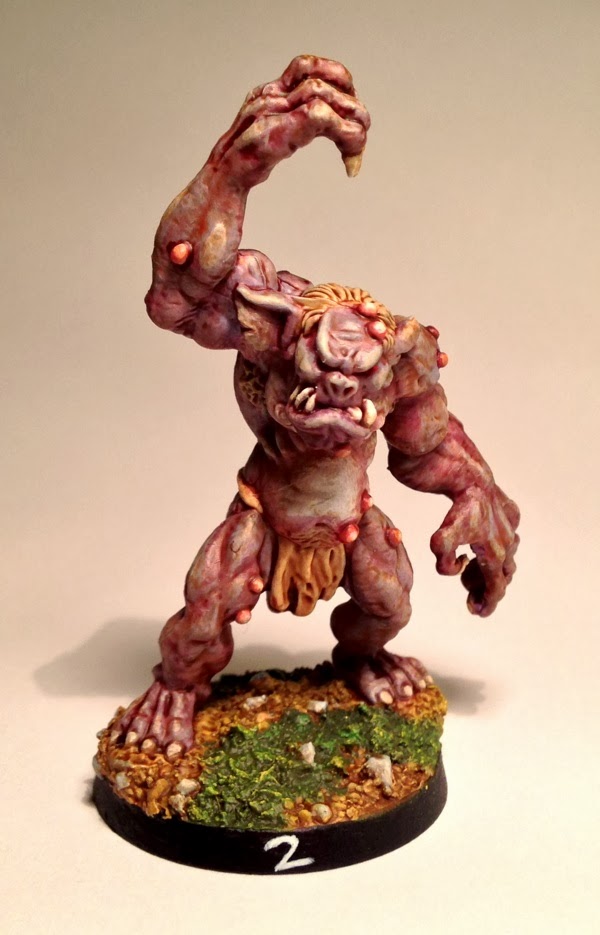
My league's Blood Bowl season for the Dungeonbowl championship officially starts tomorrow and I have been trying to convert and paint my goblin team for the opening event. Alas, I am only about half way through painting the team and it is going to pain me not to be playing with a completely painted team. Although they will not be fully painted at the season opener, I did get a few of the important figures on the team done, namely the two trolls. The models for these trolls are the Reaper Miniatures cave troll in the Bonesium plastic which set me back a measly 4 or 5 dollars for the pair of them. To help set them apart, and without having to get into any heavy conversion work, I painted them different purple tones, one more towards the blue spectrum and the other towards red. I also added a goblin to the raised hand of troll #1 so that it looks like he's getting ready to toss the little fella! On the goblin, you can see the team colors, purple and yellow, that I picked out for the Barking Spiders.
Monday, November 25, 2013
We're Off to Paint the Wizard
I am still in the process of doing the conversions on my little band of Reaper Bones goblins to prepare them for the Blood Bowl pitch. While I am finishing that conversion work, I thought I would make a diversion to paint a test figure. Since I have not had experience painting on Bones plastic before, I thought that it would be prudent to do a quick paint job on another figure in this material to get a feel for how it behaves before diving in and painting my goblins. My first step was to reread the Bones FAQ since one of Reaper's claims with their Bones line is that they are "ready to paint right out of the package." I was curious to know if this claim would hold true. My instinct was to prep them with a spray primer as I do with metal figures, but I had heard multiple reports of spray primers reacting badly with the Bones plastic and did not want to repeat those mistakes.
After looking through my collection of Bones, I decided on a wizard to use as my test subject. I am not much of a fan for integrated bases on miniatures. I like the uniform dimensions of using "standard" size bases and find that it gives figures much more stability. I started the prep on my wizard by gluing him down, integrated base and all, to a 25mm square base. I considered snipping him off of the integrated base and mounting him without it, but I felt like just gluing the whole thing down would be quicker and less bothersome to make sure that he's standing straight. I added a small amount of green stuff around the edges to round things out.
With the prep finished, I started adding paint. With the first brush stroke, the hydrophobic nature of the plastic was evident. If the paint that you use for your base layer is too watery, then the paint will have a slight tendency to bead up. For the base layers, I found it best not to thin my paint very much but instead to use it closer to the consistency straight from the pot. This hydrophobic characteristic makes putting down base coats feel quite different than doing the same on a mini with primer. However, once a base coat is down, the painting experience is pretty much the same. For a very nice review of how paint behaves on Bones plastic, please reference this article: Painting Bones Miniatures: The First Coat is the Difference.
As an additional test for this wizard project, I wanted to test out "the dip" technique. "The dip" is a common speed painting technique that is used to quickly add shading to an entire model. It's not a method that provides instant Golden Demon caliber paint jobs, but it can provide very passable table-top quality results. The fundamental concept for "the dip" is to paint your figure by applying base coats only (usually lighter pigments are better) and then applying a pigmented varnish to the entire model. "The dip" terminology refers to the process of literally dipping the entire model in the varnish and then shaking of the excess. A less messy technique is to use a throw-away brush to brush the varnish onto the figure. This is a more controlled and less messy approach and is the way I'm going to do the application. Army Painter makes a line of Quickshade products that are directly intended for this dipping technique. They also have multiple tutorials in their Galleries that detail this approach with step by step instructions. Another popular product that is used for "the dip" is the Minwax line of PolyShades. Although intended as a wood stain, PolyShades is a similar product to Army Painter's offering and can yield similar results at around a quarter to a third of the price of the Army Painter solution.
Here is my wizard after applying the base coats. I did add a quick bit of basic highlighting before "the dip" since that extra step can help yield even better results.
And, here's the result after using "the dip" on the wizard and letting the varnish set up overnight. The approach that I took was to use a very inexpensive craft brush to apply Minwax PolyShades Antique Walnut satin sheen. The antique walnut sheen is a dark brown shade with a bit of red in it, very similar to Citadel's agrax earthshade. With my cheap brush, I was able to help prevent the varnish from pooling excessively in crevices and I did not have to find an area where I could shake the miniature about with reckless abandon.
The shading really brings out the detail on his cane, makes the pouches across his chest pop out, and adds a pretty good lining effect all over the model where there are creases, such as where folds of clothes meet and the leather bits on his wrists and feet. For many table-top applications, leaving him at this stage would be acceptable, but I would at least recommend applying a matte sealer to knock off some of the shine from the varnish.
To finish the wizard, I touched up a few areas and added some highlights to make the shading pop just a bit more. Finally, I finished the base using a little more of Citadel's texture paint and then sprayed the whole figure with coat of Army Painter's Anti-Shine Matt spray.
I'm satisfied with the results and glad that I took this journey, both to get familiar with the Bones plastic and to see the effectiveness of "the dip" method. The end result is a figure which, with the exception of the base and a few minor touch-ups, was painted in a single evening. Since the Bones plastic is very flexible these figures have the ability to absorb impacts and spring back to shape after being deformed. I think that gives them a leg up in the durability category over resin or metal figures which can break or become disfigured if they're knocked from the table or handled roughly. That kind of impact resistance is not something all gamers need to take into consideration, but between the Bones plastic and the dip varnish I don't feel like I need to worry about this figure breaking or the paint job getting chipped. To close out, here are some pros and cons about Bones and "the dip" that I identified during this project.
Bones Advantages:
- Cheap!
- Durable and can stand up to some rough handling.
- No need to use primer before painting.
- Prep is difficult. It is hard to clean mold lines because of the elastic nature of the plastic.
- Figures often have warped bits out of the package that require reshaping.
- When painting over the white plastic, it is sometimes hard to see detail on the figure.
- Not as easy to convert as resin or more rigid plastics.
- Quick way to add shade to an entire figure.
- Seals and shades with a single application.
- Provides a very durable seal after drying.
- Do not have full control of what the shading will look like.
- Paint thinner is required for clean up. If brushing on, may wish to consider using throw-away brushes.
- Stripping the miniature if you want to repaint it is tougher.
- Takes a while to fully dry.
- Leaves a high-shine finish. Easily resolved by spraying with a matte sealer one fully dry.
Friday, November 22, 2013
Beantown Barking Spiders: From Bones to Blood Bowl #1
Last year, I backed the Reaper Miniatures Bones Kickstarter and when the Bones finally arrived I was a little overwhelmed by the volume of little white plastic minis that had ended up on my doorstep. When I backed the project I didn't actually have anything specific in mind for what to do with the miniatures. I just thought it would be reasonable to kick in support at the Vampire level to get enough cheap miniatures for almost any conceivable fantasy role playing scenario that I might come across in the future. However, without being currently involved in an RPG campaign I opened all of my Bones to take a closer look at what I had received and then boxed them up to wait for their turn on my workbench.
My local Blood Bowl league runs through four seasons annually that represent the same four major championships (Chaos Cup, Blood Bowl, Spike Magazine Cup and Dungeon Bowl) that are detailed in the Blood Bowl background fluff. With the start of each new season, I usually get motivated to start a new hobby project that will help me get a new team on the pitch that I haven't played before. Looking through the list of teams in the league over the last year showed zero representation for the litte, green-skinned cheaters so I thought maybe it was time to introduce some goblin mayhem into the mix. It's fitting for goblins to try to infiltrate the kingdom of the dwarves by any means necessary. A plan for a motley band of gobbo lunatics, the Beantown Barking Spiders, to play some Nuffle Amorical Football matches and earn their way into the underground dwarf stadium at Barak-Varr seems like the perfect way for them and their hooligan fans to overrun those hallowed dwarven halls.
With my goblin team in mind, I pulled out my box of Bones to see if I had anything that might be fitting. Inside I found the Pathfinder Goblins which look like they might be a perfect fit for the Barking Spiders.
If there's one thing that a goblin team in Blood Bowl needs it's a lot of players. I only had the 9 Pathfinder Goblins that came with the Reaper Vampire-level package, but I stopped in at a nearby game store last night and found that they had a blister-pack of Pathfinder goblin warriors in Bones plastic. The Bones plastic is very inexpensive and I picked it up for less that $3 USD to round out my team with 4 more goblins. One drawback to this material is that it is very common for the miniatures to warp. In the picture for the additional goblins that I bought you can see that one little fella looks like he is suffering the effects of an all-night bender. You can also see that some of the spears are a bit bent. I'm not at all concerned about the weapons since I'm going to snip them off to make the figures suitable for the Blood Bowl pitch. But, for our little friend with the hangover, I'm going to have to try giving him a hot water bath, repose him and dip him in ice water to give him new memory.
Next to a lot of players, the other thing goblins need for Blood Bowl are secret weapons. I plan on converting a few of the goblins into a looney, a fanatic and a bombardier. At the game store last night, I saw this pathfinder goblin and thought it would make a perfect pogoer. It isn't available in Bones plastic, but it was still pretty cheap and, being metal, I think will actually be easier to repose and convert into a proper pogoer.
And last, every goblin team needs its two trolls. I really couldn't find anything suitable in my box of Bones for these big guys, but I did notice that there is a troll from Reaper available in Bones plastic. In keeping with my Bones-inspired goblin team, and at only about $2 a pop, I decided to add two of these guys. I'll post more as this project continues.
Subscribe to:
Posts (Atom)